Creating a Project Using Public Data for Fun and Profit: Part 2
How to use public data to build a Next.js app to help you land your next job, and maybe make some money - part 2.
Full Stack Developer and Architect. Specialising in Java with Spring Boot, and React with Next.js. Passionate about building cloud-native applications following DDD.
This blog is part 2 of "Creating a Project Using Public Data for Fun and Profit" series.
Previous posts:
In this part, we will cover:
Adding the ability to search by postcode and radius on the landing page and the pass rates page
Adding autocomplete to the postcodes search field
Creating a page for each city, showing the nearest test centres
Creating a page listing all cities, and adding a link to this page from the landing page
All the code referenced in this post can be found in my repo here. As well, you can find a live version of the application we build here.
Adding Search Functionality
Now that we have a page that shows the nearest and best test centres based on a postcode, we need to add a user-friendly way to search by postcode.
To do this we'll add a form, with a text field for the postcode, and a dropdown for the radius.
Step 1: Create the Search Component
We'll start by adding a new component under our component directory called Search.tsx. This will contain the elements we just described and a submit button that will navigate the user to our /pass-rates page. Search.tsx should contain the following:
import {Box} from "@mui/system";
import {Button} from "@mui/material";
import Paper from "@mui/material/Paper";
import React, {useEffect, useState} from "react";
import {useRouter} from "next/router";


export default function Search({initialPostcode, initialRadius}:any) {
    const router = useRouter()
    const [postcode, setPostcode] = useState<string | null>(null);
    const [radius, setRadius] = useState<number>(10);

    useEffect(() => {
        setPostcode(initialPostcode);
        setRadius(initialRadius)
    }, [initialPostcode, initialRadius])

    function handleSubmit() {
        router.push(`/pass-rates?postcode=${postcode}&radius=${radius}`);
    }

    return (
        <Paper variant="outlined" sx={{p: 1}}>
            <div style={{display: 'flex', flexFlow: 'row wrap'}}>
                <Box sx={{m: 1, flex: 1}}>
                    <TextField label="Postcode" value={postcode} onChange={e => setPostcode(e.target.value)}/>
                </Box>
                <FormControl sx={{m: 1, minWidth: 120, flex: 1}}>
                    <InputLabel id="demo-simple-select-label">Radius</InputLabel>
                    <Select
                        labelId="demo-simple-select-label"
                        id="demo-simple-select"
                        value={radius}
                        label="Age"
                        onChange={e => setRadius(e.target.value as number)}
                    >
                        <MenuItem value={5}>5 miles</MenuItem>
                        <MenuItem value={10}>10 miles</MenuItem>
                        <MenuItem value={20}>20 miles</MenuItem>
                        <MenuItem value={30}>30 miles</MenuItem>
                    </Select>
                </FormControl>

                <Box sx={{m: 1, mt: 1.8, flex: 1, display: 'flex', flexDirection: 'column'}}>
                    <Button sx={{alignSelf: 'center'}} variant="outlined" onClick={handleSubmit} size="large">Search</Button>
                </Box>

            </div>


        </Paper>
    );
}
Here we can see that we have a TextField element for the postcode and a Select element for the radius. Our submit Button element calls the handleSubmit function when pressed, which navigates the user to the /pass-rates page, passing in the postcode and radius as query parameters.
Step 2: Add Search Component to Landing Page
Next we need to add the <Search> element to our landing page. Open index.tsx and add the following after the <div> containing the <Typography> element:
<Search initialPostcode={''} initialRadius={10}/>
Go to http://localhost:3000. You should now see the new search fields.

Try entering a postcode and clicking search, it will bring you to the /pass-rates page.
Step 3: Add Autocomplete to Postcode Search
Currently, we have no validation for postcodes in our search component. One way that we can validate postcodes is to use postcodes.io again.
We can call postcodes.io to check if the entered postcode is a real postcode. Even better, postcodes.io offers an autocomplete endpoint which we can use to show an autocomplete dropdown.
We'll add the following functions to our PostcodesAPI.ts file:
export async function getPostcodeSuggestions(partial: string) {
  return (await getPostcodeAutocompleteResponse(partial))?.result;
}

const getPostcodeAutocompleteResponse = async (partial: string) : Promise<PostcodeAutocompleteResponseDTO | null> => {
  return await fetch(`${baseUrl}${partial}/autocomplete`, {
    headers: {
      'Content-Type': 'application/json',
      'Accept': 'application/json'
    }
  }).then(response => {
    return response.json();
  }).catch(error => {
    console.error(error);
    return null;
  })
}

export const isValidPostcode = async (postcode: string) : Promise<boolean> => {
  return await fetch(`${baseUrl}${postcode}`, {
    headers: {
      'Content-Type': 'application/json',
      'Accept': 'application/json'
    }
  }).then(response => {
    return response.ok;
  }).catch(error => {
    console.error(error);
    return false;
  })
}

interface PostcodeAutocompleteResponseDTO {
  result: string[]
}
We have added:
getPostcodeSuggestions, which calls Postcodes.io's autocomplete endpoint to get the autocomplete suggestions.isValidPostcode, which checks that the passed in postcode is a valid postcode
Next, we'll create a new component with our autocomplete functionality, which will replace the postcode TextField element in the Search component.
Firstly, we'll need to install lodash.
Run the following:
npm install lodash
npm install @types/lodash
We then need to create the new component, PostcodeAutocomplete.tsx in the components directory, which should contain the following:
import * as React from 'react';
import {useCallback, useEffect} from 'react';
import Box from '@mui/material/Box';
import TextField from '@mui/material/TextField';
import Autocomplete, {AutocompleteRenderInputParams} from '@mui/material/Autocomplete';
import LocationOnIcon from '@mui/icons-material/LocationOn';
import Grid from '@mui/material/Grid';
import debounce from 'lodash/debounce';
import {getPostcodeSuggestions} from "./PostcodesAPI";
import {CircularProgress} from "@mui/material";

export const getOptionsAsync = (query: string): Promise<string[]> => {
    if(!query) return Promise.resolve([]);
    return getPostcodeSuggestions(query).then(suggestions => suggestions ? suggestions : []);
};

interface PostcodeAutocompleteProps {
    setPostcode: (s: string | null) => void
    postcodeError: boolean
    setPostcodeError: (b: boolean) => void
    submitForm: () => void
    postcode: string | null
}

export default function PostcodeAutocomplete({
                                                 setPostcode,
                                                 postcodeError,
                                                 setPostcodeError,
                                                 submitForm,
                                                 postcode
                                             }: PostcodeAutocompleteProps,) {
    const [options, setOptions] = React.useState<string[]>([]);
    const [value, setValue] = React.useState<string | null>(postcode);
    const [searchQuery, setSearchQuery] = React.useState<string>("");
    const [isLoading, setIsLoading] = React.useState<boolean>(false);

    const getOptionsDelayed = useCallback(
        debounce((query: string, callback: (options: string[]) => void) => {
            setOptions([]);
            getOptionsAsync(query).then(callback);
        }, 300),
        []
    );

    useEffect(() => {
        setValue(postcode);
    }, [postcode])

    useEffect(() => {
        setIsLoading(true);

        getOptionsDelayed(searchQuery, (options: string[]) => {
            setOptions(options);

            setIsLoading(false);
        });
    }, [searchQuery, getOptionsDelayed]);

    const onChange = (event: unknown, value: string | null) => {
        setValue(value);
        setPostcode(value);
        setPostcodeError(false);
    };

    const onInputChange = (event: unknown, value: string) => {
        setSearchQuery(value);
        setPostcode(value);
        setPostcodeError(false);
    };

    const keyPress = (e: React.KeyboardEvent<HTMLDivElement>) => {
        if (e.key == 'Enter') {
            submitForm()
        }
    }

    const renderInput = (
        params: AutocompleteRenderInputParams
    ): React.ReactNode => {
        return (
            <TextField {...params} label="Postcode" InputProps={{
                ...params.InputProps,
                endAdornment: (
                    <React.Fragment>
                        {isLoading ? <CircularProgress color="inherit" size={20}/> : null}
                        {params.InputProps.endAdornment}
                    </React.Fragment>
                ),
            }}
                       error={postcodeError}
                       helperText={postcodeError ? "Not a valid postcode" : ""}
                       onKeyDown={keyPress}/>
        );
    };

    return (
        <Autocomplete
            options={options}
            value={value}
            onChange={onChange}
            onInputChange={onInputChange}
            renderInput={renderInput}
            loading={isLoading}
            filterOptions={x => x}
            freeSolo
            sx={{minWidth: 140}}
            renderOption={(props, option) => {

                return (
                    <li {...props}>
                        <Grid container alignItems="center">
                            <Grid item>
                                <Box
                                    component={LocationOnIcon}
                                    sx={{color: 'text.secondary', mr: 2}}
                                />
                            </Grid>
                            <Grid item xs>
                                {option}
                            </Grid>
                        </Grid>
                    </li>
                );
            }}
        />
    );
}
Let's take a closer look at some of the key features in our code:
Debouncing with Lodash: We've integrated Lodash's debounce function to ensure that we only call Postcodes.io's API once the user has stopped typing for at least 300 milliseconds. This helps to minimize API calls and improve the overall user experience. We then use the data returned from the API to populate the options for our autocomplete dropdown.
Handling validation: The parent component takes care of handling the logic to set the value and error state for validation purposes.
Visual feedback for errors: If the error prop is set to true, we visually indicate that the user has entered an invalid postcode by highlighting the text field in red and displaying an error message.
Autocomplete: We're using Material UI's Autocomplete with the results from Postcodes.io to display a dropdown when the user starts typing a postcode.
Next, we update the Search.tsx component to use our new PostcodeAutocomplete component. Replace the entire component with the following:
export default function Search({initialPostcode, initialRadius}:any) {
    const router = useRouter()
    const [postcode, setPostcode] = useState<string | null>(null);
    const [radius, setRadius] = useState<number>(10);
    const [postcodeError, setPostcodeError] = useState(false);

    useEffect(() => {
        setPostcode(initialPostcode);
        setRadius(initialRadius)
    }, [initialPostcode, initialRadius])

    function handleSubmit() {
        if (!postcode) setPostcodeError(true)
        else isValidPostcode(postcode)
            .then(isValid => {
                setPostcodeError(!isValid);
                if (isValid) router.push(`/pass-rates?postcode=${postcode}&radius=${radius}`)
            });
    }

    return (
        <Paper variant="outlined" sx={{p: 1}}>
            <div style={{display: 'flex', flexFlow: 'row wrap'}}>
                <Box sx={{m: 1, flex: 1}}>
                    <PostcodeAutocomplete postcode={postcode} setPostcode={setPostcode} postcodeError={postcodeError}
                                          setPostcodeError={setPostcodeError} submitForm={handleSubmit}/>
                </Box>
                <FormControl sx={{m: 1, minWidth: 120, flex: 1}}>
                    <InputLabel id="demo-simple-select-label">Radius</InputLabel>
                    <Select
                        labelId="demo-simple-select-label"
                        id="demo-simple-select"
                        value={radius}
                        label="Age"
                        onChange={e => setRadius(e.target.value as number)}
                    >
                        <MenuItem value={5}>5 miles</MenuItem>
                        <MenuItem value={10}>10 miles</MenuItem>
                        <MenuItem value={20}>20 miles</MenuItem>
                        <MenuItem value={30}>30 miles</MenuItem>
                    </Select>
                </FormControl>

                <Box sx={{m: 1, mt: 1.8, flex: 1, display: 'flex', flexDirection: 'column'}}>
                    <Button sx={{alignSelf: 'center'}} variant="outlined" onClick={handleSubmit}  size="large">Search</Button>
                </Box>

            </div>


        </Paper>
    );
}
What we've achieved with this change:
Handling Postcode Validation: To improve the accuracy of our user inputs, we've added a new state variable called postcodeError which tracks whether the entered postcode is valid or not. We pass this variable to the PostcodeAutocomplete component to provide visual feedback to the user.
Validating Postcodes with PostcodesAPI: We now validate the postcode in the handleSubmit() method using the isValidPostcode() method in PostcodesAPI. This allows us to ensure that the user has entered a valid UK postcode before submitting the form.
Now, let's test our changes!
Go to http://localhost:3000 and try entering a postcode into the landing page. You should see something like this:
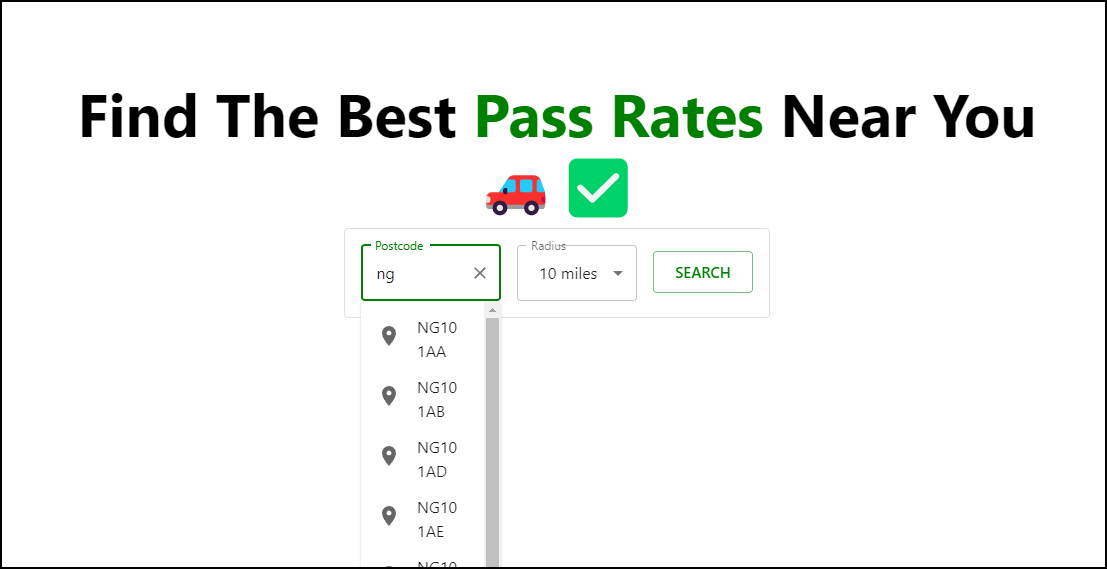
Clicking on one of the postcodes will autofill the postcode for you.
Step 4: Add Search Functionality to the Pass Rates Page
A nice extra feature would be to allow the user to search for a new postcode from the /pass-rates page without having to go back to the landing page.
As we've got the Search and PostcodeAutocomplete functionality in their own components we can easily add this to the /pass-rates page.
Replace the return block in pass-rates.tsx with the following:
return (
    <>
        <Head>
            <meta charSet="utf-8"/>
            <title>Best Driving Test Pass Rates Near Me - Pass Rates</title>
            <meta name="description" content={`Shows the latest pass rates for driving test centres near ${postcode} within a ${radius} mile radius`}/>
        </Head>
        <Box sx={{display: 'flex', justifyContent: 'center', mt: 1, mb: 1}}>
            <Search initialPostcode={postcode} initialRadius={radius}/>
        </Box>

        <Typography variant="h6">Test Centres within {radius} mile radius of {postcode}</Typography>

        <ResultsTable results={results}/>
    </>
);
The only thing we've changed here is that we've added our Search component.
The only difference between our use of Search here and in the landing page is that here we initially populate the postcode and radius fields with the previous search's parameters.
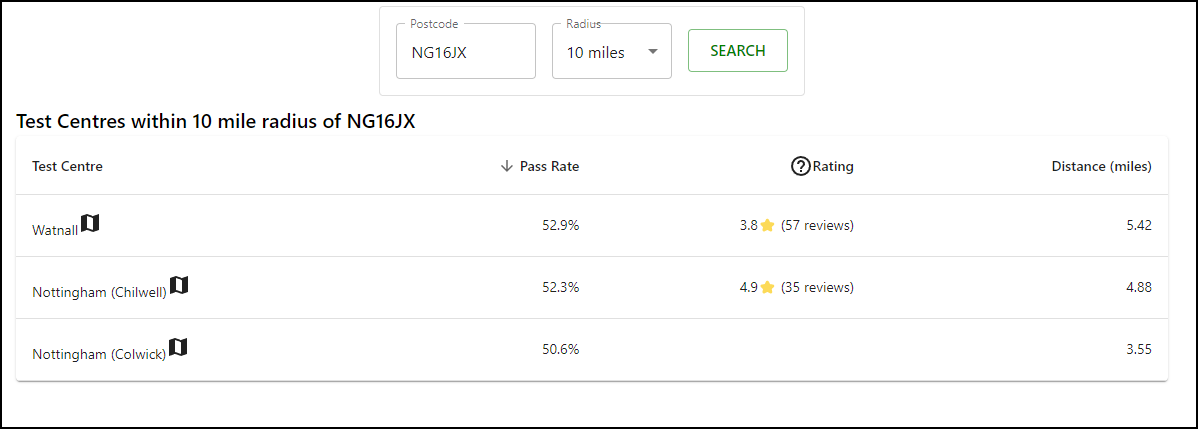
The /pass-rates page will now contain a search form at the top.
Display Nearest Test Centres for Each City
One of the key requirements for our project is to allow users to select the best test centres near a city. We want to do this for two reasons:
If the user wants to look for test centres around a specific city, they don't need to find a postcode for that city.
We can create static pages for each city, which will improve SEO (discussed in a later section) and help increase our chances of appearing at the top of Google's search results.
Step 1: Calculating the Nearest Test Centres for Each City
To calculate the nearest test centres to each city, we need to know the latitude and longitude of each city. We can start by compiling a list of all the cities in the UK from Wikipedia.
Next, we can use Google Maps APIs to search for the latitude and longitude of each city. For instance, to obtain the location data for Birmingham, we send the following request:
https://maps.googleapis.com/maps/api/place/findplacefromtext/json?input=Birmingham&inputtype=textquery&key=<YOUR API KEY>&locationbias=ipbias&fields=name,place_id
The response contains the name of the city and its place ID:
{
  "candidates": [
    {
      "name": "Birmingham",
      "place_id": "ChIJc3FBGy2UcEgRmHnurvD-gco"
    }
  ],
  "status": "OK"
}
Using the place ID, we can then send a second request to retrieve the latitude and longitude of the city:
https://maps.googleapis.com/maps/api/place/details/json?place_id=ChIJc3FBGy2UcEgRmHnurvD-gco&key=<YOUR API KEY>&fields=geometry
The response contains the location data for the city:
{
  "html_attributions": [],
  "result": {
    "geometry": {
      "location": {
        "lat": 52.48624299999999,
        "lng": -1.890401
      },
      "viewport": {
        "northeast": {
          "lat": 52.60869933491674,
          "lng": -1.709829372653529
        },
        "southwest": {
          "lat": 52.38599896742283,
          "lng": -2.017433632448159
        }
      }
    }
  },
  "status": "OK"
}
To calculate which test centres are near each city we first need to decide on what distance we consider "close". I considered anything within a 10-mile radius close.
For each city we need to go through each test centre and calculate the distance between the city and the test centre. If the distance is less than 10 miles then we add that test centre to the list of close test centres.
As before, once you have the data for each city you can use your preferred scripting language to extract the list of nearest test centres for each city.
You'll want to save each city with its closest test centres in individual JSON files. Each JSON file should be the name of the city, in a directory called cities.
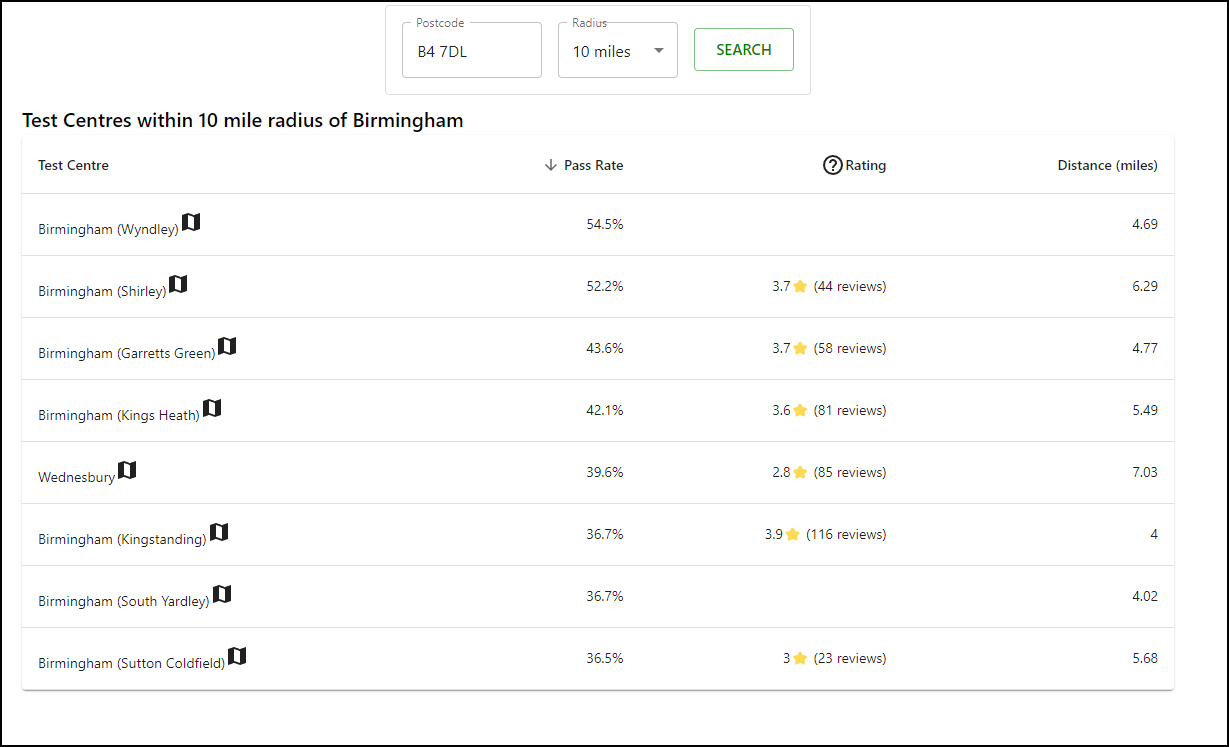
E.g. you'll have a file called birmingham.json that looks like this:
{
  "name": "Birmingham",
  "postcode": "B4 7DL",
  "testCentres": [
    {
      "name": "Birmingham (Garretts Green)",
      "passRate": "43.6",
      "distance": 4.767003603076919,
      "mapDetails": {
        "placeId": "ChIJldK_AICwcEgR2-SLap5P9Nw",
        "address": "Granby Ave, Garrett's Green, Birmingham B33 0SJ, United Kingdom",
        "name": "Garretts Green Test Centre",
        "lat": 52.4759864,
        "lng": -1.7783739,
        "rating": 3.7,
        "url": "https://maps.google.com/?cid=15921438124472526043",
        "userRatingsTotal": 58
      }
    },
    {
      "name": "Birmingham (Kings Heath)",
      "passRate": "42.1",
      "distance": 5.493458409608323,
      "mapDetails": {
        "placeId": "ChIJD1VCmci-cEgR77E87hMKPNg",
        "address": "955 Alcester Rd S, Birmingham B14 5JA, United Kingdom",
        "name": "Birmingham Kings Heath Driving Test Centre",
        "lat": 52.4067573,
        "lng": -1.8873253,
        "rating": 3.6,
        "url": "https://maps.google.com/?cid=15581339891512685039",
        "userRatingsTotal": 81
      }
    },
    {
      "name": "Birmingham (Kingstanding)",
      "passRate": "36.7",
      "distance": 4.000310419795066,
      "mapDetails": {
        "placeId": "ChIJHbuU-WOjcEgRtqaHZnumMto",
        "address": "205 Birdbrook Rd, Birmingham B44 9UL, United Kingdom",
        "name": "Birmingham Kingstanding Driving Test Centre",
        "lat": 52.5441402,
        "lng": -1.890445,
        "rating": 3.9,
        "url": "https://maps.google.com/?cid=15722812298035177142",
        "userRatingsTotal": 116
      }
    },
    {
      "name": "Birmingham (Shirley)",
      "passRate": "52.2",
      "distance": 6.287245676525351,
      "mapDetails": {
        "placeId": "ChIJWaNhJae5cEgRb7RLuTDHiaE",
        "address": "374 Stratford Rd, Shirley, Solihull B90 4AQ, United Kingdom",
        "name": "Shirley Driving Test Centre",
        "lat": 52.4051825,
        "lng": -1.8225654,
        "rating": 3.7,
        "url": "https://maps.google.com/?cid=11640053723996861551",
        "userRatingsTotal": 44
      }
    },
    {
      "name": "Birmingham (South Yardley)",
      "passRate": "36.7",
      "distance": 4.019107914150748,
      "mapDetails": {
        "placeId": "ChIJHUTeU0e6cEgRM9dvMwTt1sw",
        "address": "Driving Test Centre, Clay Ln, Birmingham B26 1EA, UK",
        "name": "Driving Test Centre",
        "lat": 52.45498449999999,
        "lng": -1.8098702,
        "rating": 0.0,
        "url": "https://maps.google.com/?q=Driving+Test+Centre&ftid=0x4870ba4753de441d:0xccd6ed04336fd733",
        "userRatingsTotal": 0
      }
    },
    {
      "name": "Birmingham (Sutton Coldfield)",
      "passRate": "36.5",
      "distance": 5.679981743492782,
      "mapDetails": {
        "placeId": "ChIJ7cilVwKlcEgRZ64gPe1-Icw",
        "address": "31-33 Birmingham Rd, Sutton Coldfield B72 1QE, United Kingdom",
        "name": "DVSA Theory Test Centre",
        "lat": 52.558625,
        "lng": -1.826348,
        "rating": 3.0,
        "url": "https://maps.google.com/?cid=14709177415366651495",
        "userRatingsTotal": 23
      }
    },
    {
      "name": "Birmingham (Wyndley)",
      "passRate": "54.5",
      "distance": 4.687979677729207,
      "mapDetails": {
        "placeId": "ChIJZQwbgeSkcEgR6650dA7bWpo",
        "address": "110-116 Boldmere Rd, Boldmere, Sutton Coldfield B73 5UB, UK",
        "name": "110-116 Boldmere Rd",
        "lat": 52.5471217,
        "lng": -1.8411731,
        "rating": 0.0,
        "url": "https://maps.google.com/?q=110-116+Boldmere+Rd,+Boldmere,+The+Royal+Town+of+Sutton+Coldfield,+Sutton+Coldfield+B73+5UB,+UK&ftid=0x4870a4e4811b0c65:0x9a5adb0e7474aeeb",
        "userRatingsTotal": 0
      }
    },
    {
      "name": "Wednesbury",
      "passRate": "39.6",
      "distance": 7.032517930498278,
      "mapDetails": {
        "placeId": "ChIJm07r2l-YcEgRVY5l3eqVSg8",
        "address": "Knowles St, Wednesbury WS10 9HN, United Kingdom",
        "name": "DVSA Driving Test Centre",
        "lat": 52.5555689,
        "lng": -2.0128767,
        "rating": 2.8,
        "url": "https://maps.google.com/?cid=1101857894814813781",
        "userRatingsTotal": 85
      }
    }
  ]
}
and another called aberdeen.json that looks like this:
{
  "name": "Aberdeen",
  "postcode": "AB24 5BA",
  "testCentres": [
    {
      "name": "Aberdeen North",
      "passRate": "57.3",
      "distance": 2.4724386179137534,
      "mapDetails": {
        "placeId": "ChIJC3xww_sNhEgR7iXmPVZSNVA",
        "address": "8GT, Balgownie Rd, Bridge of Don, Aberdeen, United Kingdom",
        "name": "DVSA",
        "lat": 57.1856443,
        "lng": -2.0964023,
        "rating": 4.1,
        "url": "https://maps.google.com/?cid=5779616227159057902",
        "userRatingsTotal": 7
      }
    },
    {
      "name": "Aberdeen South (Cove)",
      "passRate": "64.5",
      "distance": 4.274066387101663,
      "mapDetails": {
        "placeId": "ChIJTY7RiP4PhEgRDr0PT-qctJE",
        "address": "Moss Rd, Aberdeen AB12 3GQ, United Kingdom",
        "name": "DVSA Driving Test Centre",
        "lat": 57.0884979,
        "lng": -2.1077442,
        "rating": 4.3,
        "url": "https://maps.google.com/?cid=10499189161470180622",
        "userRatingsTotal": 19
      }
    }
  ]
}
Step 2: Create a Page To Show All Cities
The first thing we'll do is create a page that lists all cities. Later we'll use this page to navigate the user to each corresponding city's results page.
Before we create the page we'll create the necessary lib function to get all the city names. We do this in a similar way to how we got all the test centre data.
Create a file called cities.ts in the lib directory. This should contain the following:
import fs from 'fs';
import path from 'path';

const citiesDirectory = path.join(process.cwd(), 'cities');

export function getAllCityIds() {
    const fileNames = fs.readdirSync(citiesDirectory);

    return fileNames.map((fileName) => {
        return fileName.replace(/\.json$/, '');
    });
}
Here we exposed a function called getAllCityIds, which returns the name of all cities, with each city name taken from the name of the JSON files that we saved in the cities directory in the previous step.
We can then create a page to show all the cities. Create a new file, cities.tsx under the pages directory. This should contain the following:
import {Box, Typography} from "@mui/material";
import {getAllCityIds} from "../lib/cities";
import Head from "next/head";
import React from "react";


export async function getStaticProps() {
    const cityIds = getAllCityIds();
    return {
        props: {
            cityIds,
        },
    };
}

interface CitiesProps {
    cityIds: string[]
}


function capitalizeFirstLetter(string: string) {
    return string.split(" ").map(word => word.charAt(0).toUpperCase() + word.slice(1)).join(" ")
}


export default function cities({cityIds}: CitiesProps) {
    return (
        <>
            <Head>
                <meta charSet="utf-8"/>
                <title>Best Driving Test Pass Rates Near Me - Pass Rates</title>
                <meta name="description"
                      content={`A list of all the cities in the UK, each linking to the latest pass rates for driving centres in that area.`}/>
            </Head>
            <Box sx={{display: 'flex', flexDirection: 'column'}}>
                <Typography variant="h2">Cities</Typography>
                <ul>
                    {cityIds.map(id => <li key={id}>{capitalizeFirstLetter(id)}</li>)}
                </ul>
            </Box>
        </>
    )
}
Here we load the city names using getStaticProps (so on build time), and render a list containing each city name.
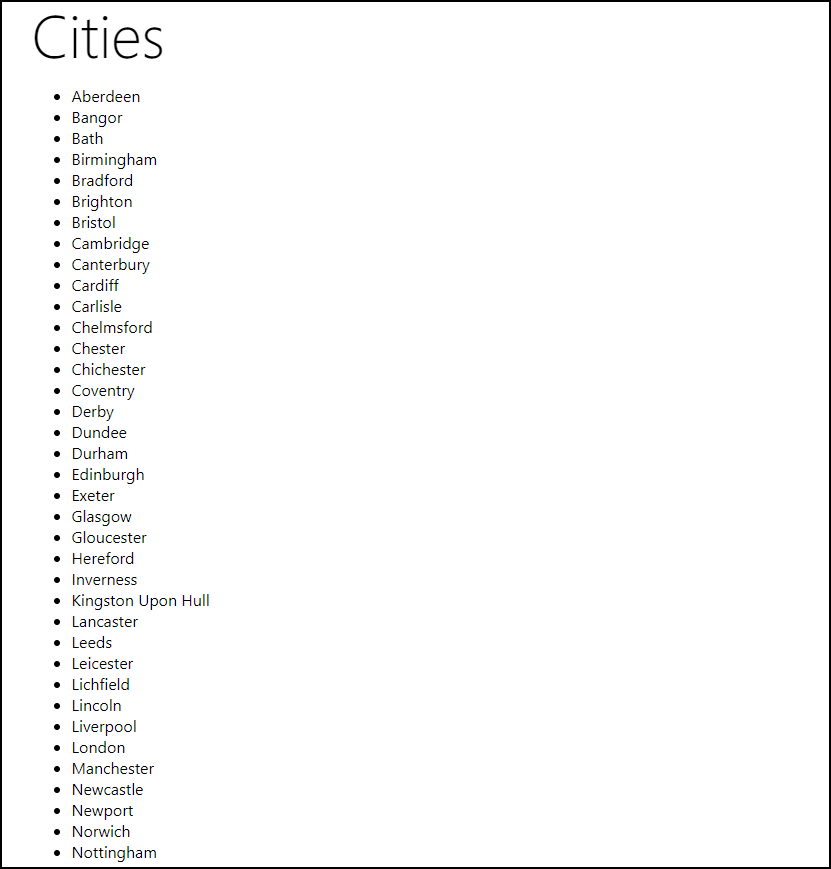
Navigate to http://localhost:3000/cities. You will see a page containing all the city names.
Step 3: Create a Page For Each City
Now that we have a list of all the cities, we need to create a page for each city.
To achieve this, we will create a static page for each city that we have JSON data for in our cities directory. These pages will have the URL format /pass-rates/<city name>.
This means that Google can easily index these pages and return them when someone searches for the best driving test centres near a city.
You might have seen that other websites do something similar to this, where they create static pages for commonly searched criteria to increase their chances of appearing at the top of Google's search results (amongst other benefits).
One example of this is crontab.guru which has static pages for commonly used cron expressions, e.g. every 5 minutes, which can be found at https://crontab.guru/every-5-minutes.
If you search in Google for cron job every 5 minutes, then that page will be the first result.
Thankfully we don't have to create each city's page by hand. We can easily accomplish this by using Next.js's getStaticPaths function, which allows us to specify a list of paths that should be generated as pages during build time.
To start, we will need to generate a list of city names. In the cities.ts file located in the lib directory, add the following function:
export function getAllCityPaths() {
  const fileNames = fs.readdirSync(citiesDirectory);

  return fileNames.map((fileName) => {
    return {
      params: {
        id: fileName.replace(/\.json$/, ''),
      },
    };
  });
}
This function reads the contents of the cities directory and returns an array of city names by removing the .json extension from the file names. To use getStaticPaths we need to have each city in the format above, which is each city has an object containing a params property, which contains an id property, which is set to the name of the page.
Next, we need to create a new page that will display the test centres for a particular city. Create a directory called pass-rates under the pages directory, and then create a file called [id].tsx under the pass-rates directory. It is important that the square brackets are included in the name, as that tells Next.js that we want the page name to be derived from the list passed to getStaticPaths.
The [id].tsx file should contain the following:
import {getAllCityPaths} from "../../lib/cities";
import React from "react";

export default function City({id}: any) {
  return <>
    {id}
  </>;
}

export async function getStaticPaths() {
  const paths = getAllCityPaths();
  return {
    paths,
    fallback: false,
  };
}

export async function getStaticProps({params}: any) {
  const id = params.id;
  return {
    props: {
      id
    }
  }
}
This file exports two functions, getStaticPaths and getStaticProps. getStaticPaths is used to generate the paths for each city, and getStaticProps is used to fetch the data for each city based on the path. For now, we are just rendering the name of the city.
As we placed our [id].tsx file under the pass-rates directory, any generated page will be found at /pass-rates/<page>.
Let's test this out! Navigating to the generated page for Birmingham. Go to http://localhost:3000/pass-rates/birmingham. You should see a page showing the city name.

Show the Nearest Test Centres For Each City
Now that we have the generated pages, let's populate each of them with the nearest test centre data.
First, we'll need to add another function to cities.ts in the lib directory to get the data for each city. Add the following function:
export function getCityData(id: string) {
  const fullPath = path.join(citiesDirectory, `${id}.json`);
  const fileContents = JSON.parse(fs.readFileSync(fullPath, 'utf8'));
  // Combine the data with the id
  return {
    id,
    ...fileContents,
  };
}
This function parses the JSON from each city file and returns it, with the city name set as the id property.
Next, let's change the getStaticProps function to call getCityData, and then change the React component to render the results. Replace [id].tsx completely with the following:
import {getAllCityPaths, getCityData} from "../../lib/cities";
import React from "react";
import Head from "next/head";
import {Box} from "@mui/system";
import ResultsTable from "../../components/ResultsTable";
import Search from "../../components/Search";
import {Typography} from "@mui/material";

export default function City({cityData}:any) {
  return <>
    <Head>
      <meta charSet="utf-8"/>
      <title>Best Driving Test Pass Rates Near {cityData.name}</title>
      <meta name="description" content={`Shows the latest pass rates for driving test centres near ${cityData.name} within a 10 mile radius`}/>
      <link rel="canonical" href={`https://drivingpassrate.co.uk/pass-rates/${cityData.name}`}/>
    </Head>
    <Box sx={{display: 'flex', justifyContent: 'center', mt: 1, mb: 1}}>
      <Search initialPostcode={cityData?.postcode} initialRadius={10}/>
    </Box>

    <Typography variant="h6" >Test Centres within 10 mile radius of {cityData.name}</Typography>

    <ResultsTable results={cityData.testCentres}/>
  </>;
}

export async function getStaticPaths() {
  const paths = getAllCityPaths();
  return {
    paths,
    fallback: false,
  };
}

export async function getStaticProps({ params }:any) {
  const cityData = getCityData(params.id);
  return {
    props: {
      cityData
    }
  }
}
What we've changed:
In
getStaticProps, we are now callinggetCityDatato retrieve the test centre data for the selected city. We then add this data to the props.We are rendering the
Searchcomponent, which is used to search for a test centre by postcode. We are passing in the postcode for the selected city so that it is used as the default search term.We are passing the test centre data to the
ResultsTablecomponent, which is responsible for rendering the table that shows the pass rates for each test centre. We are only passing the test centres that are nearest to the selected city.
Going to http://localhost:3000/pass-rates/birmingham will now show a page very similar to the /pass-rates page:
Step 4: Link Each City Name in /cities
The next step is to go back to the /cities page and add a button for each city that links to the city's individual page.
Open the cities.tsx file under pages and replace the React component with the following:
export default function cities({cityIds}: CitiesProps) {
  return (
          <>
            <Head>
              <meta charSet="utf-8"/>
              <title>Best Driving Test Pass Rates Near Me - Pass Rates</title>
              <meta name="description"
                    content={`A list of all the cities in the UK, each linking to the latest pass rates for driving centres in that area.`}/>
            </Head>
            <Box sx={{display: 'flex', flexDirection: 'column'}}>
              <Typography variant="h2">Cities</Typography>
              <Box>
                {cityIds.map(id => {
                  return (
                          <Link href={`/pass-rates/${id}`} passHref key={id} style={{textDecoration: 'none', color: 'inherit'}}>
                            <ListItemButton >
                              <ListItemText primary={capitalizeFirstLetter(id)}/>
                            </ListItemButton>
                          </Link>)
                })
                }
              </Box>
            </Box>
          </>
  )
}
This code changes each city name into a button that links to the corresponding city page.
Navigate to http://localhost:3000/cities. You will see the updated page with a button for each city.
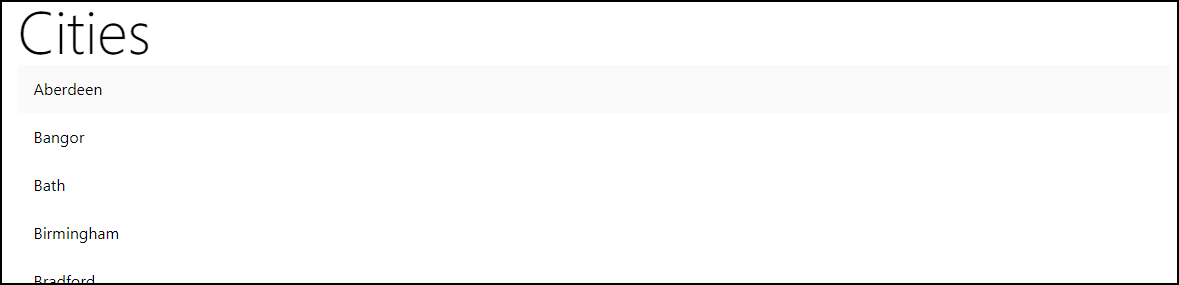
Clicking on any button will now bring you to that city's page.
You might notice that it's slow to render the city pages. This is because Next.js is rendering the pages on the fly at runtime when running the app in dev mode. When the application is deployed in production mode it will be much faster as each page will be statically rendered at build time.
Step 5: Add a Link to /cities on the Landing Page
Finally, let's add a link to our /cities page from the landing page.
Open index.tsx and add the following code under the <Search/> element:
<Box sx={{m: 2, mt: 1.8, display: 'flex', flexDirection: 'column'}}>
  <Link href={`/cities`} passHref>
    <Button sx={{alignSelf: 'center'}} variant="outlined" component="a">See all cities</Button>
  </Link>
</Box>
Visit http://localhost:3000 to see the updated landing page with the "See all cities" button:

Conclusion
This completes part 2!
Let's review what we've done here:
Added the ability to search by postcode and radius on the landing page and the pass rates page
Added autocomplete to the postcodes search field
Created a page for each city, showing the nearest test centres
Created a page listing all cities, and add a link to this page from the landing page
You can find all the code used in this post in my repo here. As well, you can find a live version of the application we built here.
Look out for part 3, where we'll be adding the finishing touches and deploying our application!
Updated: Part 3 is now available. Read it here.
Till next time!